I loved my Firefox 3.6, even though it wasn't the best memory citizen nor the fastest browser out there. However, because of its vast number of extensions, it was my preferred browser by several a long shot. What I liked the most was that it handled my 30-or-so perpetually-open tabs very well (with lots of assistance from Tab Mix Plus).
Firefox 4 is abysmal (by comparison or on its own). It has an enormous memory leak that renders my system unusable after an hour or two of using it. I checked memory usage with MacOSX's Activity Monitor and Firefox 4 was using more memory than Eclipse (a notorious memory hog) and had paged around 2 GB of virtual memory.
As much as I miss Tab Mix Plus and my other extensions, I had to switch to Chrome. Yes, I could go back to Firefox 3.6...but I don't feel like Mozilla deserves it.
Please Mozilla, fix Firefox 4.0. I don't love using Chrome, but you leave me no other choice.
My friend Flavio and I record a Spanish-language podcast dedicated to Apple products called Puromac. Since he currently lives in Puerto Rico and I'm in New York City, we talk over Skype and record the conversation using either Audio Hijack Pro or Call Recorder for Skype.
In our most recent episode, Flavio's mic produced an audible 60hz hum throughout the whole podcast. When he ran the audio file through Levelator (an excellent utility to adjust the levels of all audio within a file) the hum was made even louder. Before doing any post work on the audio file, I needed to remove the hum.
I use Audacity for my audio editing and while it has a very good Noise Removal tool, it was failing to pull out the hum completely, leaving a "thumping" effect over the audio. My guess is that the harmonics of the electrical hum (the frequency isn't a solid 60hz) were a problem for the Noise Removal tool.
What I needed was a notch filter--a filter that removes a specific frequency from an audio signal. My plan was to use a notch filter to remove the bulk of the hum and then clean up the rest using Audacity's Noise Removal tool.
Searching around the web, I found a Nyquist script that removed a 60hz hum along with an additional 4 of its harmonics.
Audio samples (You will need headphones to hear the differences):
Original audio file with a noticeable hum.
An attempt to remove the hum using solely Audacity's Noise Removal tool. You will notice there is still a hum in parts of the dialogue which fades in and out.
The stereo Nyquist script below applied to the original file.
The stereo Nyquist script applied followed by Audacity's Noise Removal tool.
What is Nyquist?
Nyquist is a programming language for use in audio and music applications developed at Carnegie Mellon University (my alma matter). Version 2.x of the language (which is what Audacity uses) is written in Lisp. Audacity's help page has a very brief but informative introduction into Lisp. I recommend reading it as it makes the Nyquist script below easier to understand. You can also visit the Nyquist page at CMU for more information.
Removing a 60hz hum with a Nyquist script:
Audacity doesn't have a full Nyquist development environment, but it does have a plugin that allows you enter a Nyquist script to run and debug.
In Audacity, select a portion of the audio you want to clean. (You could select the whole thing, but since there is no preview function for Nyquist scripts, and my audio was more than a hour long, I selected a representative portion of the audio, ran the script, made sure it worked, pressed Command-Z (on a Mac) to undo the script, selected the whole file then ran the script again. )
If you're working with a mono audio tractk, select Effect:Nyquist Prompt... then in the window that pops up, enter the following script.
(notch2

(notch2

(notch2

(notch2

(notch2

s

300 10)

240 8)

180 4)

120 2)

60 1)
... Then click "OK".
This runs a recursive set of notch filters (the notch2 function) on the audio signal, filtering out 60, 120, 180, 240 and 300 hz frequencies.
For a stereo track, the script is more involved:
(vector

(notch2

(notch2

(notch2

(notch2

(notch2

(aref s 0)

300 10)

240 8)

180 4)

120 2)

60 1)

(notch2

(notch2

(notch2

(notch2

(notch2

(aref s 1)

300 10)

240 8)

180 4)

120 2)

60 1) )
This script is the same as the first, except that it handles 2 inputs via a vector (basically an array).
If you still hear a little bit of hum (I did, though it was barely audible), use the Noise Removal filter in Audacity for that last bit of noise.
Examining the Nyquist script:
As I understand it, in Lisp everything is a function call. The format for all calls is:
([FUNC_NAME] [ARGS...])
The notch2 function is called like this:
(notch2 s 60 1)
Where "notch2" is the name of the function, "s" is the first argument referring to the audio signal (I guess Audacity calls it "s" and makes it available globally), "60" is the value in Hertz of the frequency to extract and "1" is the Q factor.
The Nyquist and Audacity documentation don't talk much about what a Q factor is, except that it's the "depth and width" of the function, or the "fudge factor" around the frequency. My friend Taylor sent me this Wikipedia article on Q factors after seeing the original version of this blog posts in which I conceded ignorance on the subject. Essentially, a value below 1 creates a wider notch, while a value above it creates a narrower one.
Though it's a little harder to read, you get a better sense of the recursive nature of the call. The inner notch2 function call filters out 300hz with the signal "s" as the input. The output of that call is fed to the second notch2 call, which filters out 240hz. Then comes 180hz, 120hz and finally the outer call filters out the remaining 60hz signal from the audio.
After writing this blog entry I discovered that Audacity already has a notch filter routine already written as part of their downloadable library, so that you can add it to Audacity's plug-ins folder. It's not clear to me why these plugins don't come installed by default.
Looking at the code for Audacity's notch.ny, I don't think it handles harmonics like the script above, but it's certainly easier to use and knows the difference between a mono and stereo file.
I bought a Black & Decker DustBuster a couple years ago because my wife and I have two dogs and we wanted a convenient way to spot-clean any dog hairs we found. I figure it would also be handy for when I spilled coffee grounds or sugar all over the floor--something I do often enough to justify a hand-held, cordless vacuum cleaner.
Like all DustBusters, this model came with a wall mount and a small charger so that device could be ready to go, always charged, at the first sign of a dust-bunny attack.
My model came with NiCd batteries installed, as I assume all of them do. NiCds have a lot of advantages over other battery chemistries, including less internal resistance (so the can supply large currents), a lower self-discharge rate (last longer unused) and can stand deeper discharges. These types of batteries are also less expensive than lithium polymer or nickel-metal-hydride batteries so they are used in many devices to lower the cost of manufacturing.
The big negative about NiCds, however, is that they suffer from a 'memory effect' where, in some circumstances, NiCds appear to only charge from the point of the last charge cycle. So, over time, they appear to have markedly less capacity.
That is what happened to my DustBuster so that about after a year of owning it, I couldn't use it for more than a few minutes without it running out of power.
I looked around for a replacement battery pack and discovered that you can't buy one. They sell replacement filters, nozzles and attachments but not battery packs.
Rather than buy a new DustBuster, I decided to replace the internal batteries with NiMH (Nickel-Metal-Hydride) batteries which don't suffer from the memory effect and have at least twice as much charge density.
has a great FAQ about different battery chemistries and how different types of charging styles affect the life of those batteries.
Charging Math:
The NiCds that came with the DustBuster have a new cell capacity of 1500mAh (milliamp hours) and the wall charger which came with the vacuum charges at about a rate of around 100-150 mA (milliamps). Using a
, which factors in electrical inefficiencies, gives us around an 18-hour charge (which happens to be what Black & Decker recommends for the initial charge before using).
I wanted greater capacity, but I also didn't want to use a different charger other than the one which came with the vacuum, and I didn't want to extend my charge time to 5 days. So, while I had my choice of battery capacity, I settled on 3300mAh NiMH cells. They would have extended capacity and wouldn't be damaged by a little over-charging after the initial 30-36 hours for the first charge.
The DustBuster battery compartment has room for 13 1.2V sub-C sized cells, which is a standard size somewhere between a C and a AA. It's a popular cell used a lot for radio controlled models. I bought my original NiMH batteries from a website that is no longer in business. I have since bought a great set of replacement cells from Amazon.
NOTE: I bought the cells with metal tabs attached to the positive and negative terminals because I knew they would make soldering much easier. Unless you have metal strips to attach the cells and are very good at soldering, I suggest you get your cells with tabs as well.
A 40W (or higher) soldering iron.
Don't try to do the soldering with a small iron (15W and 25W the most popular other sizes). The batteries act as giant heat sinks and you won't be able to heat the surface enough to properly solder using anything less than a 40W iron. (I've never used this model, but Radio Shack has an adjustable wattage soldering iron)
Rosin Core Solder
I find that thin solder melts more readily. It's often called 'light duty' but it's no different from thicker solder. (I use this 60/40 tin/lead solder from Radio Shack. Make sure to ventilate when you use it)
Hook up wire
You'll need about 2" of either solid core or braided wire to attach two of the pack's center batteries. (I use this 22ga wire from Radio Shack)
Tape
I found that using clear tape was helpful in holding the batteries together for soldering and grouping together in the final pack. You could use any thin tape like cellophane or masking tape.
How to do it:
The basic steps are:
Take apart the DustBuster.
Disconnect and remove the battery pack.
Solder together new cells to match the configuration of the original battery pack.
Place the new cell in the battery pack housing and put everything back together.
Steps in detail:
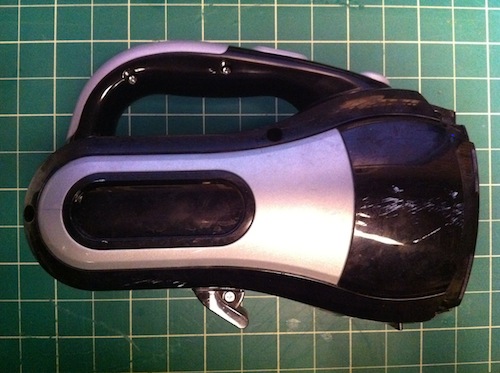
Take apart the DustBuster.
Here's the vacuum on its side, without the nozzle and filter set. There are 7 screws that hold it together. Keep in mind that the screw in the hanging hook is smaller than the other 6 screws.
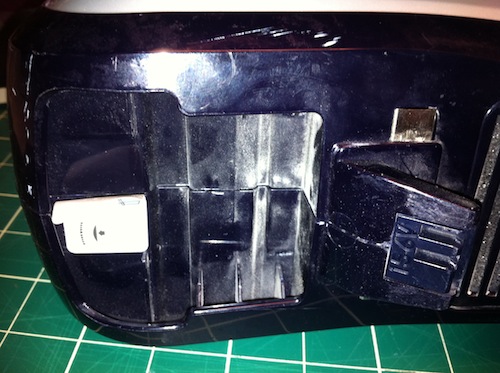
Remove all attachments and pull back the sticker in the attachments well.
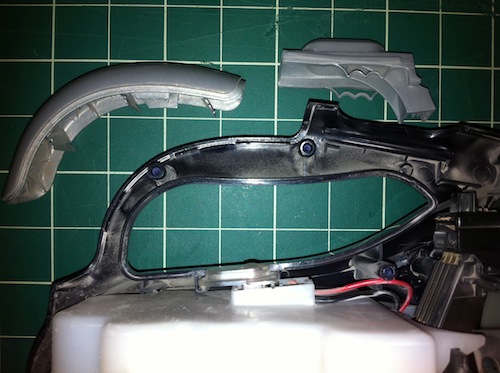
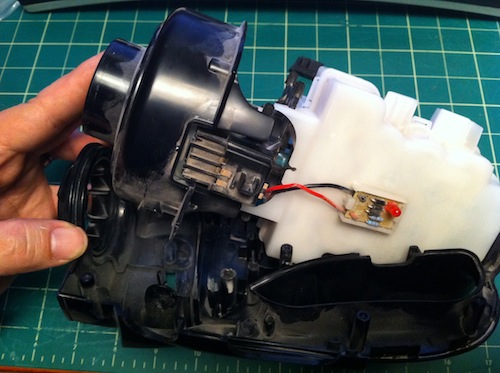
Here's what the vacuum looks like with one side removed.
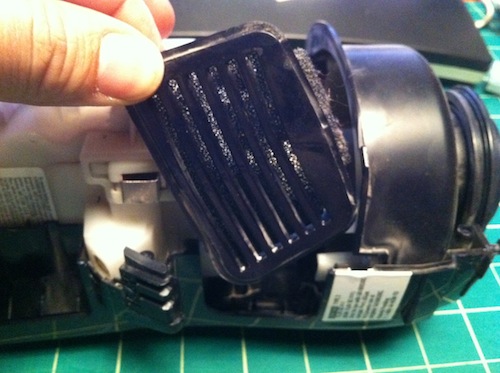
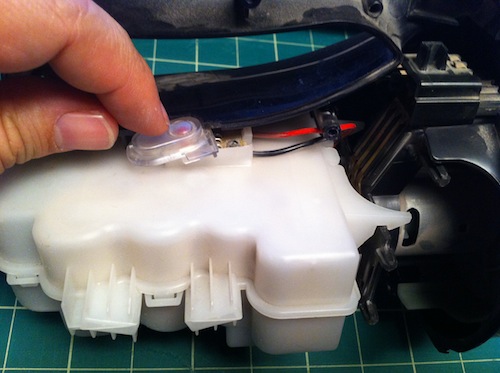
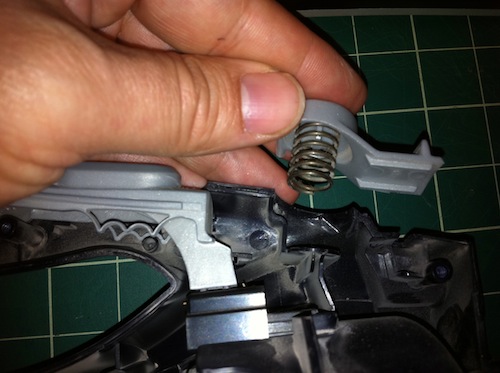
Now remove the filter underneath, the charging LED cover, the power switch, handle cover and nozzle latch. NOTE: Be careful when removing the power switch as you could turn on the vacuum and cut your hand and/or fingers.
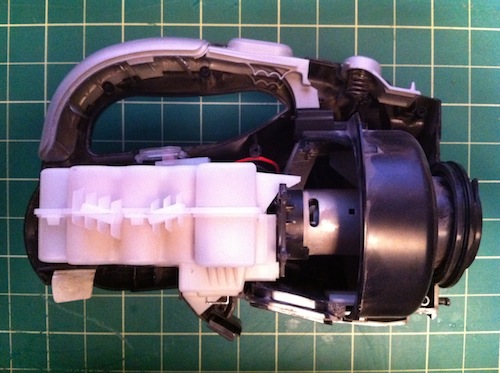
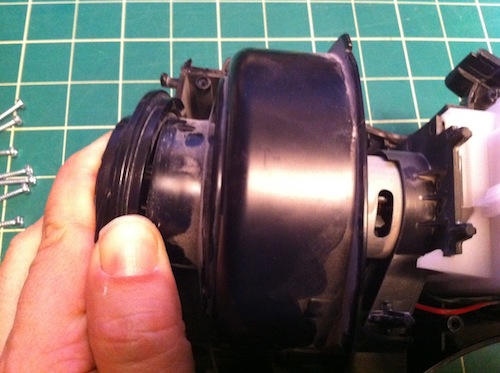
Next, remove the fan and motor housing along with the battery pack. I had to pull the front disc away from the fan housing with quite a bit of force to get this to work.
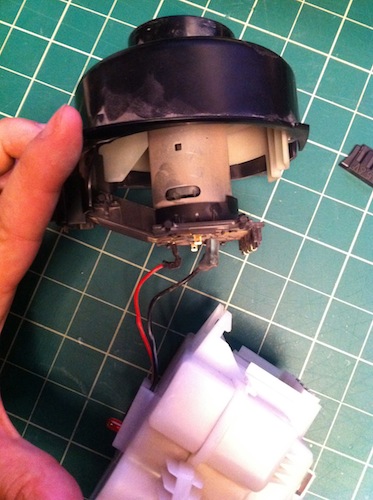
Here's the fan/motor housing and battery pack separated from the vaccum's outer casing.
The white battery pack clips onto the motor and fan housing, forming one unit.
Unclip the motor/fan housing from the battery pack and disconnect the power cables from the motor.
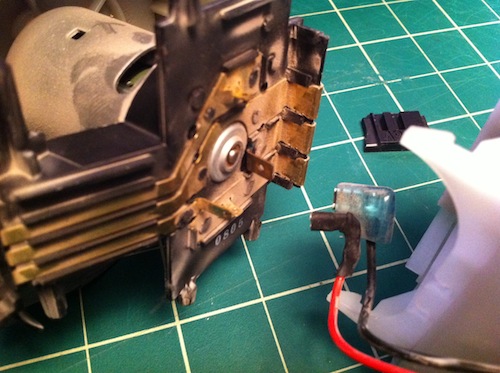
Positive and negative leads disconnected from the motor.
Take apart the battery pack.
Open the battery pack, remove the batteries and cut the wires going to the positive and negative charging pads that are connected to the front two batteries.
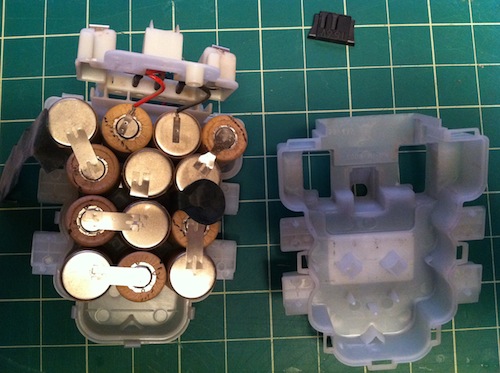
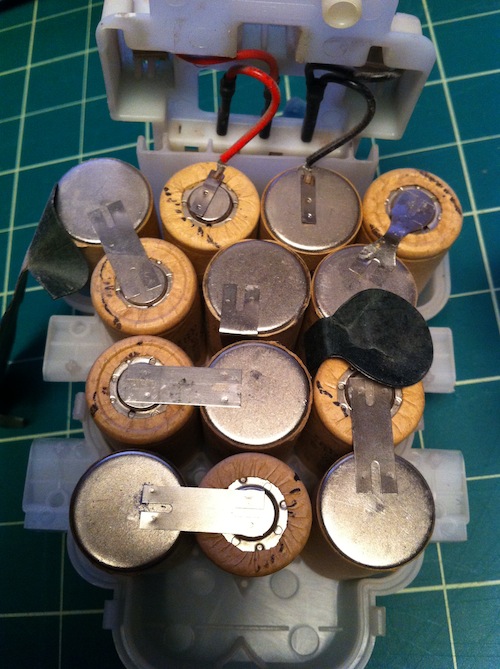
13 cells connected to form the original battery pack.
Rebuild the battery pack.
This is the hardest part of the project, as you probably guessed. WARNING: Because these batteries have metal tabs, it's very easy to short-circuit them (touch negative to positive, closing a circuit). If you short-circuit the batteries you could burn yourself, cause a fire or possibly an explosion. Be very careful when handling the batteries and think about where the metal tabs are going and what they're touching.
You'll notice that the battery pack is just a big chain of 13 batteries connected positive to negative back and forth ending with the two batteries at the top of the picture above. The charging connectors are attached to these two final batteries. The red lead goes to positive and the black to negative.
You will want to duplicate the back and forth nature of the battery pack with your own cells, using the tabs to solder the batteries together.
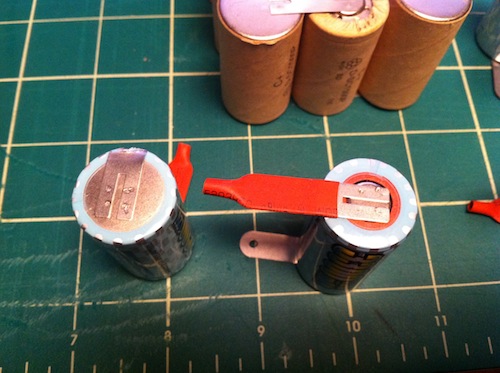
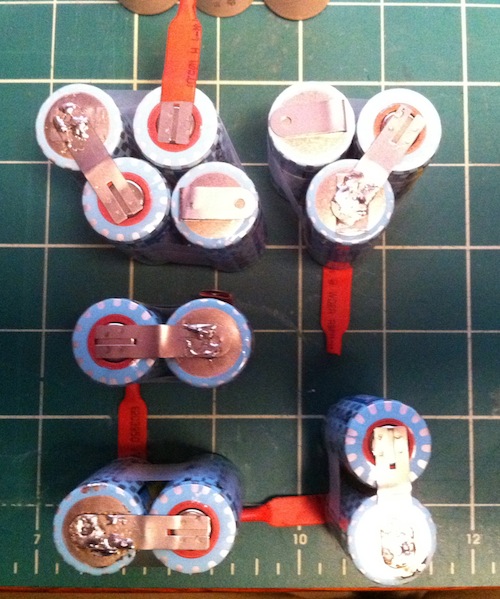
I tried a few strategies, but the best for me was to cut the tabs on the negative side of the cells so that they were flush with the side of the battery, but leave the top tab (positive side) uncut. Here is the bottom of a cell showing how I cut the tab. Next to it is another cell showing the untouched insulated positive side tab.
Soldering Tip: What worked best for me, after trial and error, was to place the batteries side by side so that the positive lead of one battery sat as flush as possible to the negative side of the battery I wanted to solder. Then I made as much contact with the soldering gun tip and the edge of the positive lead. When I thought it was hot enough to met the solder (around 5-10 seconds in my case) I touched the solder to the edge of the positive lead. What I wanted was to have the solder melt and slip underneath the positive tab, filling the space between the tab and the negative side of the battery with molten solder.
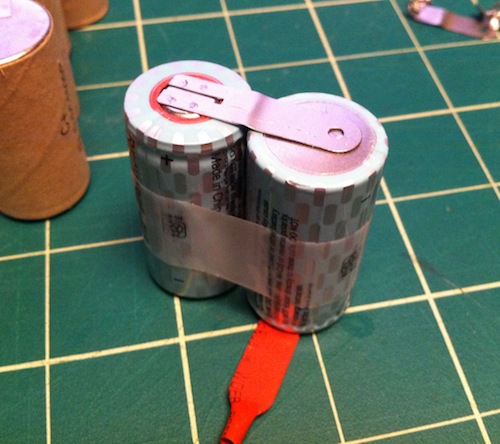
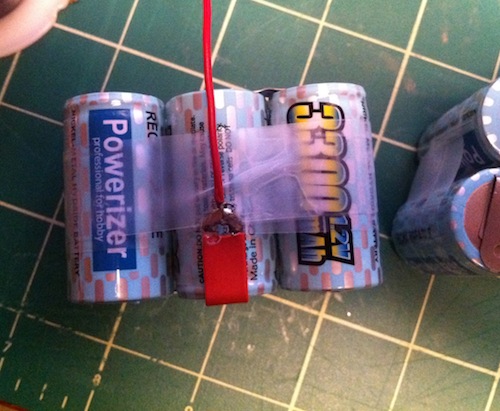
Build your battery pack by grouping batteries in 2, 3's and 4's using tape to secure them together. The tape will help you steady them while you solder.
Plan ahead and lay out the groups of batteries to make sure they match the original battery pack. Do not remove the insulating sleeves on the positive terminals until you're ready to solder. REMEMBER: Be careful of short circuits.
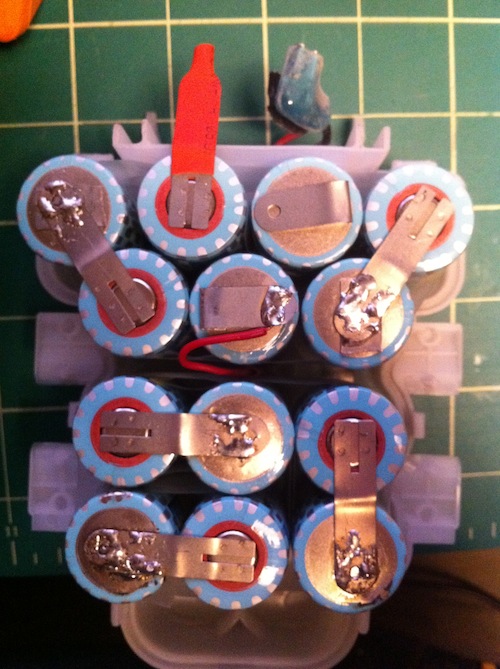
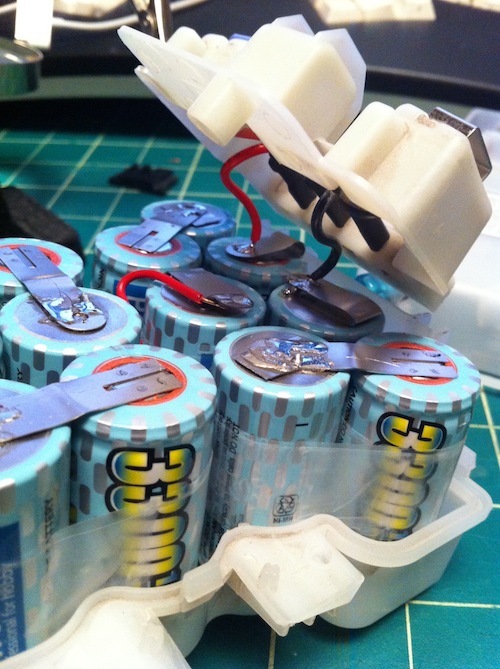
You will need to connect the two middle batteries using a piece of hookup wire. Notice that I trimmed away just a bit of the insulation to allow me to solder one end of the hookup wire.
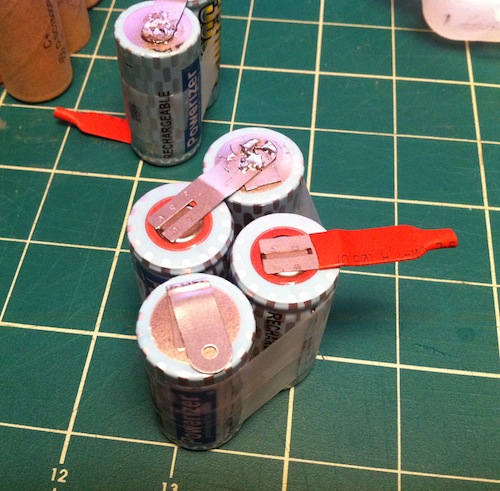
Almost done: Battery pack showing all batteries in place, including the connection between the two center batteries.
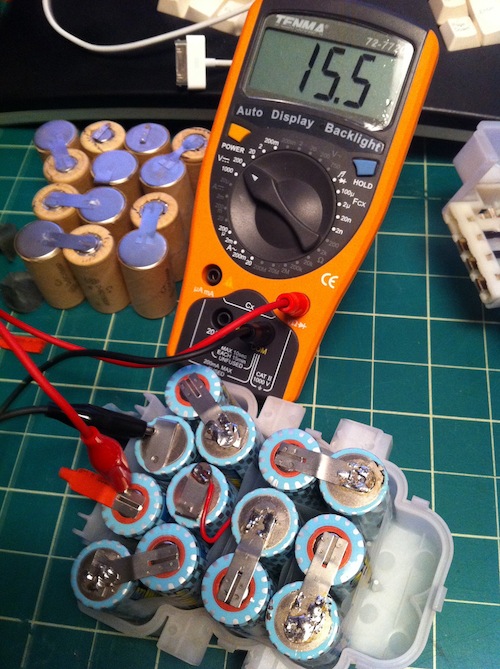
Check the connections: During soldering and assembly, I used a multimeter to verify that my solders were good and that current was flowing between cells. Here is my final check on the voltage of all 13 cells (13 x 1.2v = 15.6).
Final soldering: Re-attach the charging plate leads to the last two unconnected batteries in the chain. Red wire goes to the positive battery tab and the black wire goes to the negative tab. Notice that rather than cut the tabs, I just folded them over to make soldering the final charging wires easier.
Re-assemble the DustBuster.
Final Notes:
It will take around 24 hours to fully charge the new NiMH cells. If you don't use your DustBuster very often, leave it plugged in for 24 hours every 4 weeks to top off the batteries. It's probably a good idea not to leave the cells charging all the time, as a trickle charge may damage the batteries.